
Landscape Photography Gear: What to Pack (and What to Leave Behind)
The first time I set my bag down on the black sand at Reynisfjara, the rain was coming in sideways and my hood was already useless. I unzipped, looked at the landscape photography gear inside, and did the math I always do when the weather turns. Half of what I had packed was not coming out that afternoon. The other half was the half I trusted, and it was the half that made shots happen.
That is what this post is about. Not the biggest kit and not the newest. The best gear for landscape photography is the kit you can carry a full day and rely on when the weather turns. Everything below is what I actually pack, and what I leave behind.
Table of Contents
The Camera and Lens You Trust
The Tripod Is Not Optional
Filters, and Which Ones Earn a Slot
Protecting Your Gear From the Weather
Cold Weather Kit and the Battery Problem
The Small Things That Save a Shoot
Carrying It All, and the Weight Question
What I Actually Pack
Final Thoughts
Landscape Photography Gear FAQs
The Camera and Lens You Trust
The buying guides put the camera first because a body is the most expensive thing you can sell affiliate links for. In the field, the body is not what makes the day. What makes it is the body you know well enough to operate without thinking, and the lens you can reach for in the wind without checking.
The Body That Earns Its Place
For landscape, dynamic range and weather sealing matter more than resolution. A sealed body a few years old will outperform an unsealed flagship the moment the weather turns. My working body is the one I have used long enough to change settings by feel in the dark. Every camera has a stated temperature limit. Read yours honestly rather than trusting a sealing claim at the bottom of the range.
Two Lenses Do Most of the Work
A wide for the sweeping scene, and a short telephoto for compression and for pulling a subject out of a busy landscape. Those two earn their weight on most trips. One versatile zoom often beats three primes: a 24-70 and a 70-200 are what I return to. Reach for the ultra wide on purpose, not by default
The Lens You Can Leave Home
The third prime almost always stays in the bag at home. If I take a 24-70, I do not need a 35. The ultra wide comes only when I know the scene earns it.
The Tripod Is Not Optional
A tripod is what turns a scene into a photograph in low light. If you cannot commit to carrying one, you cannot commit to shooting blue hour, long exposures or any moving water.
Why It Earns the Weight
For long exposures in practice, like silky water on a waterfall or a bracketed frame that stitches into a single high-dynamic-range image, a still camera is not optional. This is where a tripod stops feeling like a chore and becomes the reason the shot exists. If you are packing light and thinking of leaving the tripod behind, you are leaving those shots behind too.
Choosing One That Survives the Conditions
The locks matter more than the model badge.. Twist locks pack smaller but jam when sand or salt works into the threads. Lever locks clear faster in the field. Carbon over aluminum in the cold: metal legs pull heat straight out of your hands. The sturdiest tripod is the one you actually bring; a studio-grade set that stays home stabilizes nothing.
Filters, and Which Ones Earn a Slot
Filter roundups list five or six kinds. Two earn a slot in my bag on every trip. The third has been quietly replaced by better sensors.
The Polariser You Use Every Day
A polariser is the one filter with no software substitute. It cuts glare off wet rock, foliage and water, and it deepens a pale sky by a stop or two. You cannot add any of that back later. Mine goes on the front of the wide lens before I leave the car for anything with water in it.
ND for Water and Light
A neutral density filter buys you longer exposures in bright light: silky water at midday, smoothed cloud, blurred motion. You do not need the whole set. A three-stop and a six-stop cover most of what people reach for, and if you want to understand how many stops you are actually adding, the physics is straightforward.
Why You Can Probably Skip the Grad ND
Graduated ND filters were essential when a single frame could not hold the dynamic range between bright sky and dark foreground. Modern sensors and bracketing have replaced them for stills. When shooting into a low sun, you can bracket a few frames and merge in Lightroom for a result cleaner than any glass grad could give you. Save the weight and the money.
Protecting Your Gear From the Weather
This is the section the buying guides skip. It is also the section that decides whether the gear you bought works when you need it.
Rain, and What Actually Keeps Water Out
A proper rain cover over the camera is the plan. A dry bag or a shower cap can improvise, but the routine failure point is the front element, not the body. Weather sealing buys you time; it does not make a camera waterproof. What keeps rain shots working is wiping the front element between frames, and a cloth that is not itself soaked. Two dry cloths in a sealed pouch is what I carry.
Salt and Sand Are the Real Enemies
On the coast, sea spray is the real threat, not the rain. Salt etches lens coatings as it dries and works into every seam a camera has. On black sand beaches, fine grit gets into everything and is harder to see than salt. The end-of-day routine matters more than any purchase: blow off grit, wipe with a barely damp cloth (not dry, which grinds), then dry it before it sits overnight. These habits carry across to any rough, unpredictable conditions, which is why the urbex gear post shares the same cleaning routine.
Humidity and Condensation
For humid climates, a silica gel packet in the camera pocket and a dry bag for anything electronic. Condensation inside a lens is the fastest way to lose a day, and humidity is where it starts. The cold-to-warm rule that follows is the acute version.
Cold Weather Kit and the Battery Problem
Cold changes what your gear does. The temperatures on the specification sheet were tested in a lab, not on a ridge at first light. Two things go wrong first: batteries, and moisture.
Why Your Batteries Die, and the Fix
In cold weather, batteries lose voltage as the chemistry slows. Your camera reads the voltage and thinks the battery is empty, even when there is charge left inside. Kept warm in an inside pocket against your body, that same battery recovers and runs the camera again. The trick is rotation: one in the camera, one warming in the pocket. In Iceland in winter I sometimes carry four, because rotation only helps if you have enough to cycle.
Condensation Will Ruin a Shoot
Bringing a cold camera into a warm room or car pulls moisture onto and into it. The sensor and the lens elements fog, and inside the body that fog takes hours to clear. Seal the camera in a bag before going inside, and let it warm up sealed so water forms on the bag rather than the sensor. This one habit has saved me more afternoons than any other.
Staying Out Long Enough to Get the Shot
The best cold weather kit is whatever keeps you out there when the light finally arrives. Gloves that let you operate a camera matter more than the warmest you can find. Layering matters more than any single expensive shell. There is more on shooting through winter in a separate post; the point here is that what keeps you outside is part of the kit.
The Small Things That Save a Shoot
None of these are exciting to write about. Each has saved a day I would otherwise have lost.
Remote release or intervalometer. For shake-free long exposures and time lapse.
Spare cards, and a field backup. A card can fail. A small portable SSD and a card reader are insurance on a trip more than a day from a computer.
A headlamp. For pre-dawn walks in, finding a dropped lens cap after sunset, and reading a map when the phone dies in the cold.
A blower and sealed cloths. A blower before a cloth, always: a dry cloth grinds grit into the coating.
An L bracket. So switching to portrait does not throw off a levelled tripod.
A multitool. For a loose tripod plate, a stuck zipper, and small failures that would end a shoot without one.
Carrying It All, and the Weight Question
How you carry the kit changes how much of it you can use. A bag that fights you on rough ground turns a productive walk into a slog.
A Bag Built for the Field
A landscape bag needs weather resistance you can rely on and side access so you do not lay it in a puddle to change a lens. For scrambling over uneven ground, chest and waist straps matter more than pocket count. What I carry for urbex is similar, because rough is rough. The difference for landscape is that you spend more time walking with the bag on, so how the straps sit matters more.
How Much Is Too Much
The rule from a lifetime of walking: a pack over a fifth of your body weight costs you endurance and steadiness by the end of a day. If you weigh 70 kilos, that is 14 kilos of camera, lenses, jackets and lunch. For a longer take on how much a pack should weigh, REI has the sensible outdoor version.
What to Leave Behind
The essential kit for landscape photography is small: a body, one or two lenses that cover wide and short telephoto, a tripod that will survive where you shoot, and a polariser. Everything else is nice to have. Weather protection and cold-weather habits are essential in specific conditions, not always. Once you can name what is essential, you can name what to leave behind. The second body stays home for a day hike. The third prime stays home when a zoom covers it. If a lens has stayed in the bag for three trips running, it is not earning its slot.
What I Actually Pack
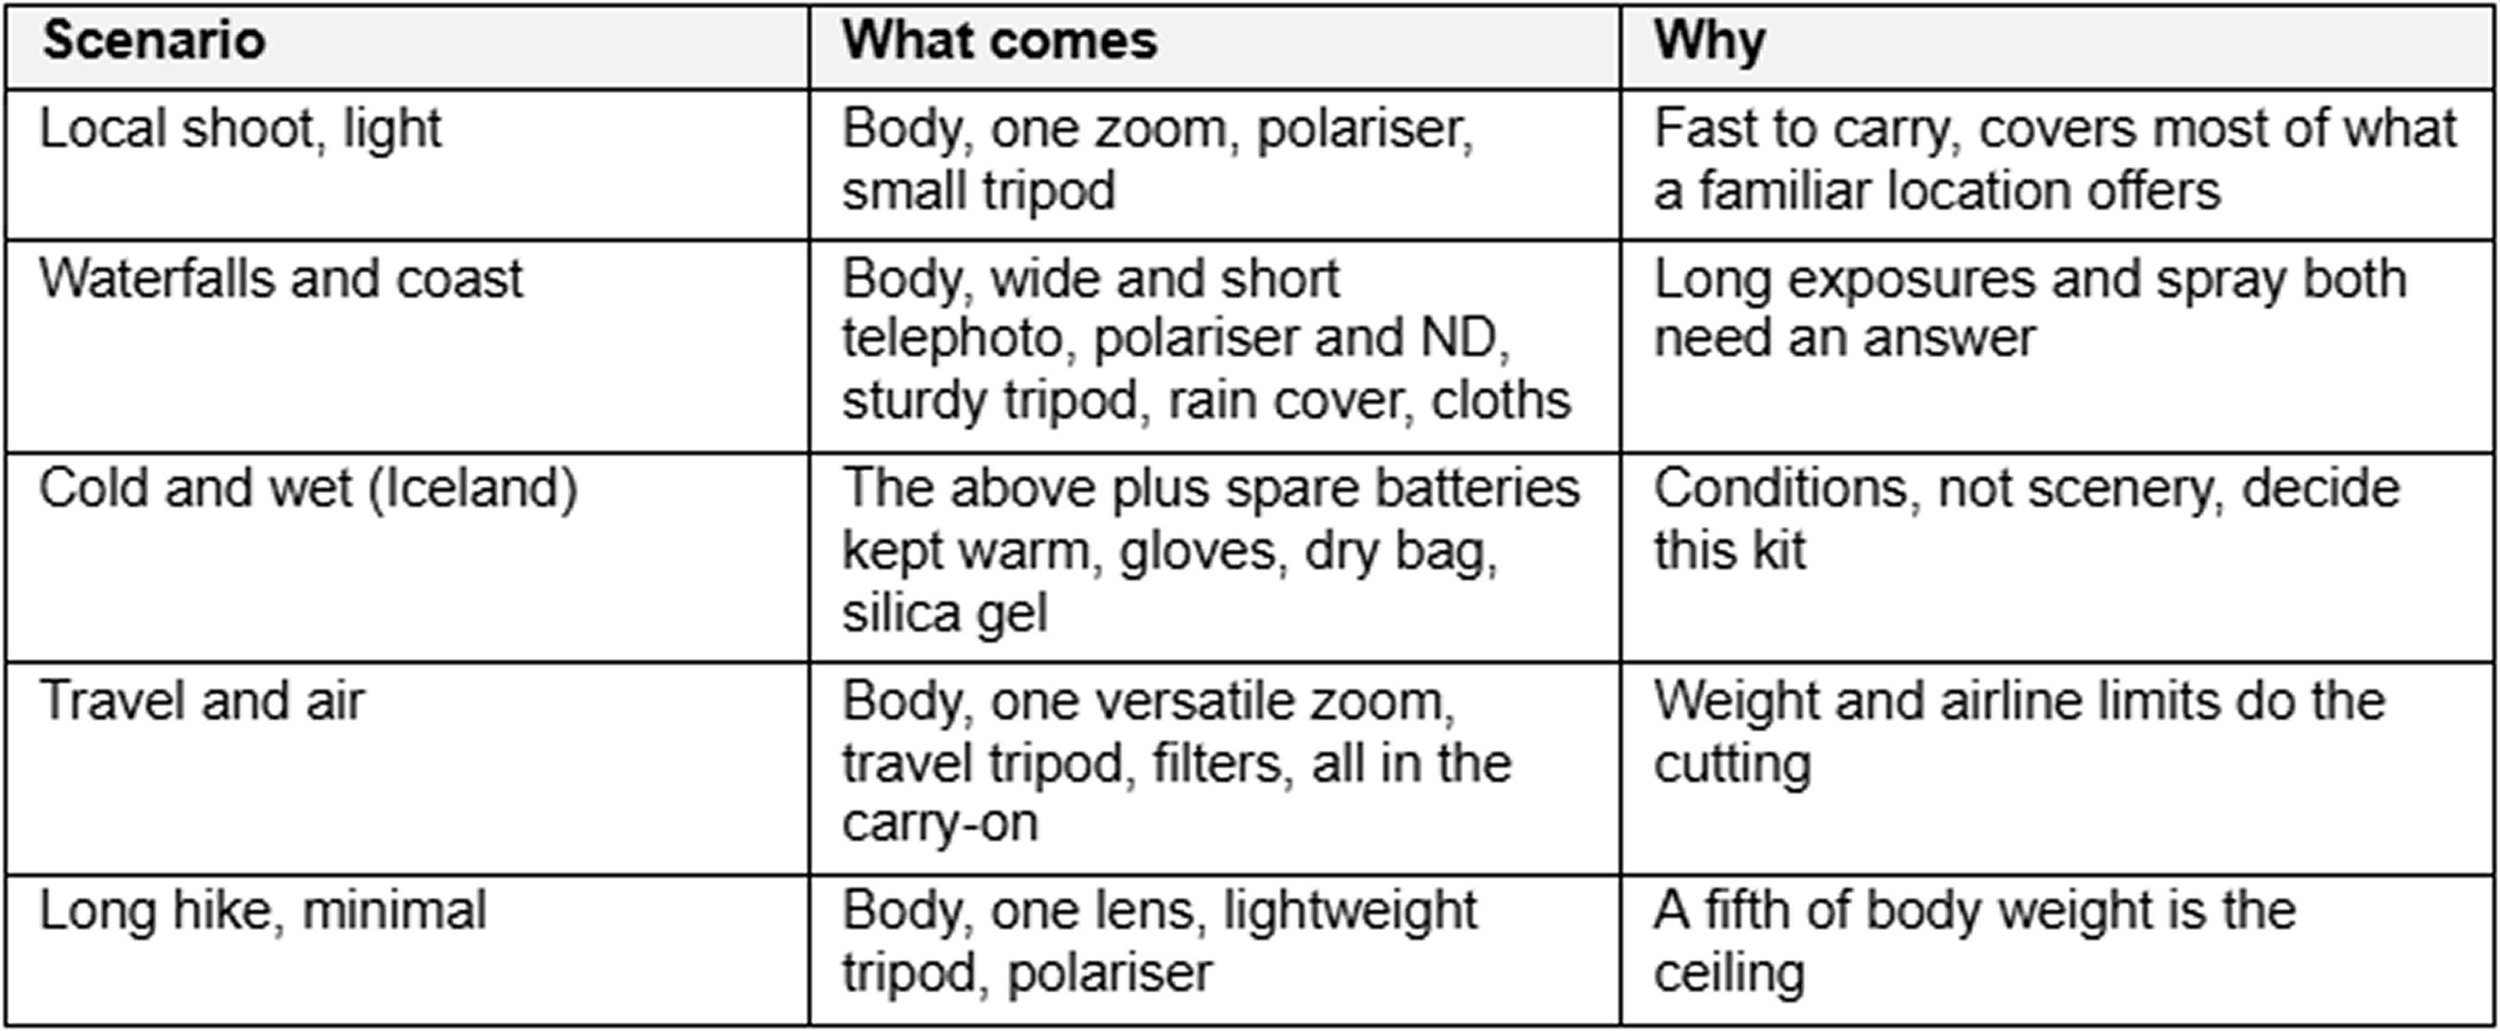
For a cold, remote landscape trip like Iceland, the landscape photography kit that earns its weight is: a sealed body, a wide and a short telephoto (or one 24-70 and one 70-200 zoom), a polariser and a three- or six-stop ND, a sturdy tripod, a rain cover, spare batteries with a way to warm them, gloves you can operate a camera in, a dry bag, silica gel and cloths. Conditions, not scenery, decide this kit. Everything else depends on how far you are walking.
The table below is how I think about the split before a trip. It is a starting point, not a prescription.
Final Thoughts
The gear matters far less than being in the right place when the weather does something interesting. Every serious landscape photograph I have made started with being there, in weather I could have talked myself out of, with a kit I could actually carry to the spot. The point of packing well is to still be out there when the light finally arrives, and to react when it does.
Nothing on this list is expensive to add. Most of it costs less than a lens hood. The habits cost nothing, and they are what I lean on when a trip has not gone the way I hoped. Pack light enough to walk in, and stay out longer than feels reasonable. The rest is luck.
Landscape Photography Gear FAQs
What gear do you need for landscape photography?
The core landscape photography equipment is a camera body you know well, one wide and one short telephoto lens (or a versatile zoom that covers both), a sturdy tripod you will actually carry, a circular polariser, and weather protection appropriate to where you shoot. Everything else is nice to have. The list adjusts by conditions, not by scenery.
Do you need a tripod for landscape photography?
For low light, blue hour, long exposures and brackets, yes. You cannot handhold your way into a silky waterfall or a stitched high-dynamic-range frame. If you shoot the softer light most landscape photographers chase, a tripod is not optional.
What is the best lens for landscape photography?
A short telephoto is more useful than most people expect. The 70-200 range compresses a scene and lets you pull a subject out of a busy landscape. If you can only take one lens, a versatile 24-70 zoom covers more real landscape situations than any prime.
How do I protect my camera from rain and cold?
For rain, a proper rain cover and a habit of wiping the front element between frames. For cold, keep spare batteries warm against your body and rotate them, and seal the camera in a bag before you bring it into a warm room so condensation forms on the bag.
What should I pack for a landscape photography trip abroad?
What to pack for landscape photography abroad depends on the conditions. For a cold, remote trip like Iceland: a sealed body, wide and short telephoto lenses, a sturdy tripod, a polariser, a three-stop and six-stop ND, at least three batteries with a way to warm them, a rain cover, a dry bag, silica gel, gloves you can operate a camera in, and a headlamp. Travel photography gear must also fit airline carry-on limits.
Do you need a full frame camera for landscape photography?
No. A modern APS-C or micro four-thirds body has more than enough dynamic range for landscape work, especially when you can bracket. Full frame helps with low light and shallow depth of field, neither of which is what landscape photography asks for most. The body you know beats the body that is newer.